
Here’s how to export Shopify data, edit it in a spreadsheet, and import your changes with Altera. We’ll also cover results, scheduled jobs, and settings.
- Working with spreadsheets
- Export Shopify data
- Edit the file
- Import to Shopify
- Read the results
- Jobs
- Run Altera without the UI
- Commonly used settings
- Getting help
Working with spreadsheets#
Altera imports and exports Shopify data using spreadsheets. You export a data type to a file, edit it in Excel, Google Sheets, or another spreadsheet app, and import your changes back into Shopify.
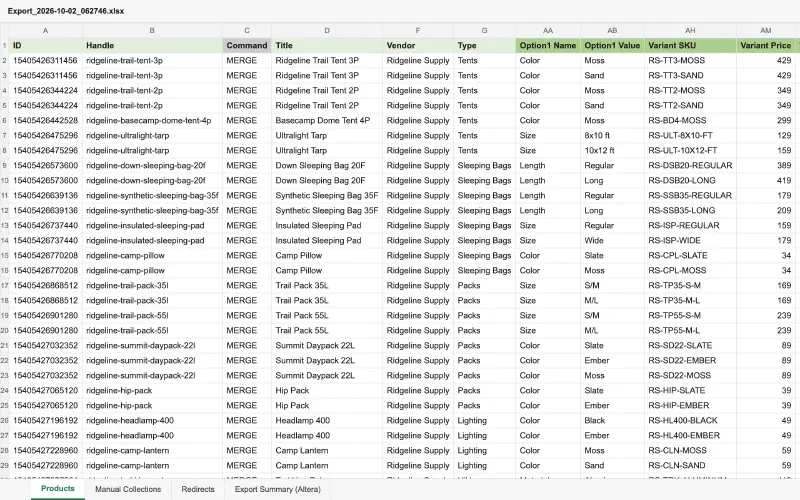
Files are Excel or CSV. An Excel file holds one tab per data type, so one workbook can include products, collections, and redirects. Each tab is named after its data type, and Altera uses the name to work out what the tab contains.
Altera uses the same spreadsheet format as Matrixify, including sheet names, column names, and colors. If you already have Matrixify files, you can import them into Altera without any changes. Altera also supports additional data types and columns.
You do not have to start from a blank sheet. The first import tutorial includes a sample file, and for metafields and metaobjects Altera generates an Excel template pre-filled with the definitions on your store (metafield template, metaobject template). Every column for every data type is documented in the field reference.
Altera supports 23 Shopify data types. The full list is on the home page.
Export Shopify data#
Create an export#
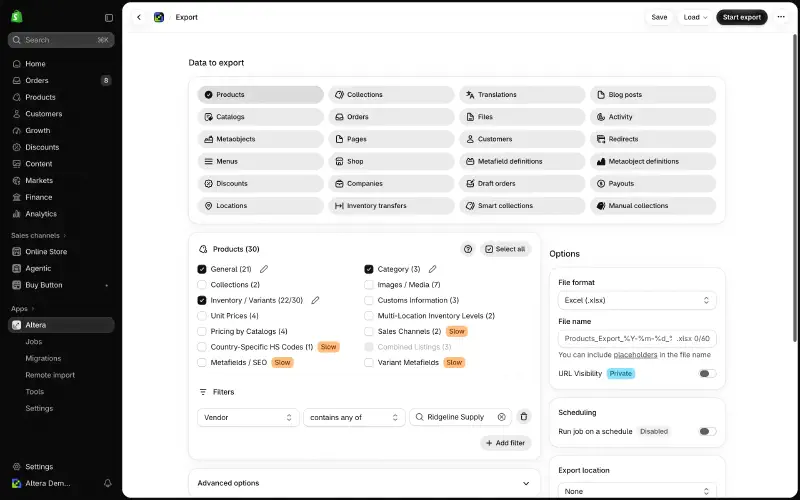
From the Altera home page, choose New export. Pick one or more data types, then choose what to include for each one. Fields are grouped (General, Variants, Images, and so on). Select a group to include it, and open it to switch individual fields on or off. Fewer fields means a faster export and a smaller file. Metafields take the longest, so leave them out when you do not need them.
Add filters to narrow the export: a date range, a product type, a customer segment, a status. Filters combine, so an export can be “products of one type created since Monday” rather than the whole catalog. See understanding filters.
At the bottom of the page, set the file name and choose Excel or CSV. You can use placeholders to include the shop name and date in the file name automatically. The export create page article covers every option.
Where the file goes#
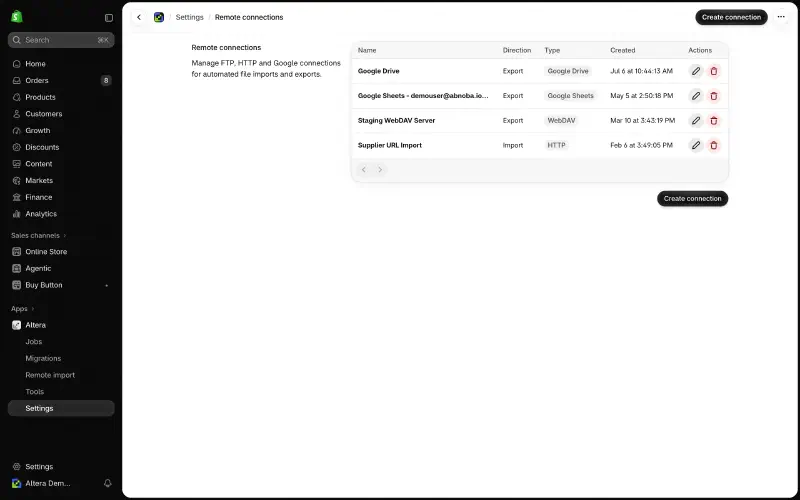
By default you download the file from the job page when the export finishes. You can also send it somewhere: Google Sheets, Google Drive, FTP, SFTP, or a WebDAV server. A Google Sheets export writes into a sheet with formatting and updates the same sheet on the next run, so a report your team reads in Sheets stays current without anyone downloading anything. Set a destination up once under Remote connections and pick it by name in any export. See the Google Sheets and Google Drive page and exporting to FTP, SFTP, or WebDAV.
While the export runs#
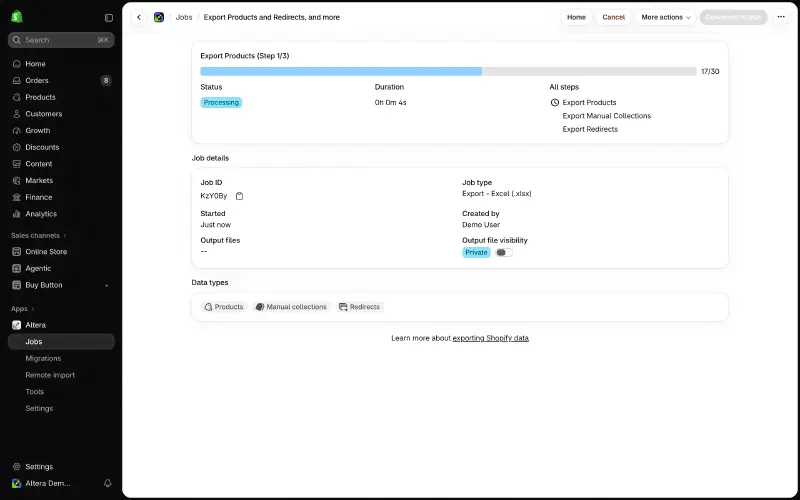
Choose Start export. The export runs on Altera’s servers, so you can close the tab while it runs. The job page shows the current step, a progress bar, item counts, and how long the job has been running. Altera can email you when it finishes. Large exports are split into several files automatically to keep individual files manageable.
Run it again#
Use Run Again to repeat a finished export, or Clone Export to reuse its setup for a new one. To repeat it on a schedule, switch on Run on a schedule and choose how often, down to every hour. Scheduled exports can be edited after they are created, and the job page shows the next run time. Scheduling is a Pro feature. See how to back up your store automatically.
Edit the file#
Import only the columns you change#
Altera does not need the whole file back. Keep the column that identifies the row and the columns you changed, and delete the rest. Columns that are not in the file are left alone in Shopify. This is faster, and it removes the risk of overwriting something you did not mean to touch.
A metafield column that is present in the file but empty for a row clears that metafield. If you are not changing a metafield, remove its column.
How Altera finds the row#
Every row needs at least one identifier. ID is the most reliable, and it is in every export. Without an ID, Altera matches on Handle for products, collections, and blog posts, on Name for orders and draft orders, on Email for customers, and on Variant SKU for product variants. See how to bulk update products by SKU for a typical SKU-driven update.
The Command column#
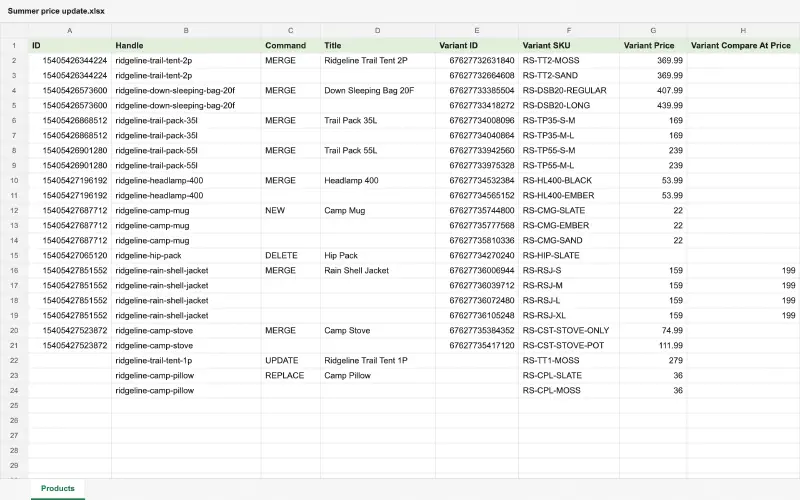
The Command column tells Altera what to do with each row. Leave the column out, or leave a cell empty, and Altera uses MERGE.
- MERGE updates the item if it exists and creates it if it does not.
- NEW creates the item. If it already exists, Altera marks the row Skipped rather than Failed.
- UPDATE only updates items that already exist.
- REPLACE deletes the item and recreates it from the data in the file, and only that data. The preview warns you when a file contains REPLACE or DELETE commands.
- DELETE deletes the item.
- IGNORE skips the row.
The import best practices article covers when to use each one.
What people do with this#
Here are a few common uses:
- Update prices and inventory by SKU
- Add variants to existing products
- Publish or unpublish variants on specific sales channels
- Refund orders by line item in bulk
- Import and export translations and market adaptations
- Duplicate a store
You can find more examples in the how-to collection.
Files from other systems#
If the file comes from another platform or an ERP, Altera can rename, reorder, and extract columns on the way in, so you do not reshape it by hand every time. See data transformations.
Import to Shopify#
Upload a file or use a remote source#
Choose Upload file on the home page and pick the spreadsheet. Or choose a remote source instead: Google Sheets, Google Drive, an FTP, SFTP, or WebDAV server, or a URL. A remote source can run on a schedule, so a Google Sheet your team edits flows into Shopify every hour without anyone uploading it. See syncing Google Sheets to Shopify and importing from FTP, SFTP, WebDAV, or a URL.
Preview before anything runs#
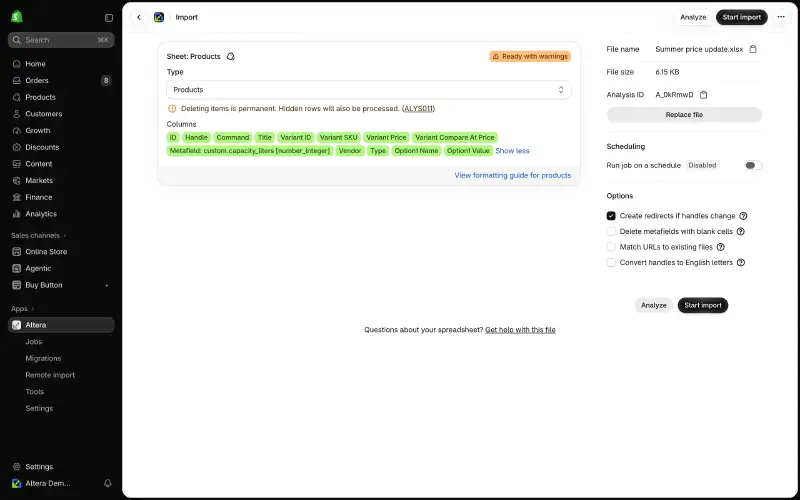
Altera analyzes the file when you upload it, usually within seconds. The preview shows the detected data type and column mapping. You can change the data type in the dropdown if needed. It also flags encoding and formatting issues and warns you about DELETE or REPLACE commands. No changes have been made to your store yet.
For a more detailed check, use a dry run. Altera processes the file and reports the outcome without writing anything to Shopify.
Each analysis has an ID. Quote it if you contact support about a file.
Options#
Run the import now, or switch on Run on a schedule and pick a date and time. You can also set notifications for this one job, overriding your store-wide setting. Then choose Start import.
While the import runs#
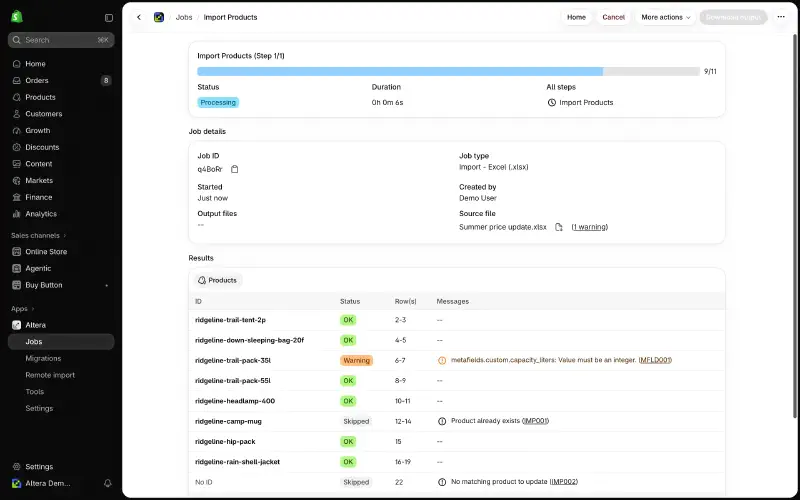
The job page shows the current step, a progress bar, and item counts. You can cancel at any point. Rows appear in the results table as they finish, each one linked to the item in the Shopify admin, so you can check the first few items while the rest are still running.
Read the results#
Four statuses#
Every row ends up in one of four states.
- OK: imported as written.
- Warning: imported, with something to look at. Altera skips an invalid metafield and keeps the rest of the row, for example, and tells you which one.
- Skipped: nothing to do, such as a NEW command on an item that already exists.
- Failed: not imported, with the reason.
Results table#
The job page lists every row with its status, and each row links to the item in the Shopify admin. You can check individual items here without downloading the results file.
Results file#
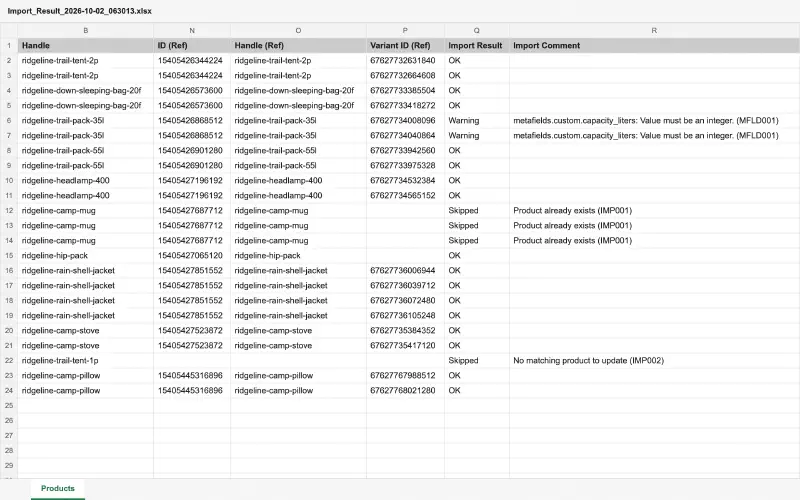
Choose Download Output for the results file. It is your original spreadsheet with columns added at the end: ID (Ref) and a second reference such as Handle (Ref) or Variant ID (Ref), filled from the real item in Shopify, plus Import Result and Import Comment. The Ref columns are what you use to reference newly created items in your next import. Import Comment holds the warning or error text, and every code is explained in the error and warning codes reference.
Jobs#
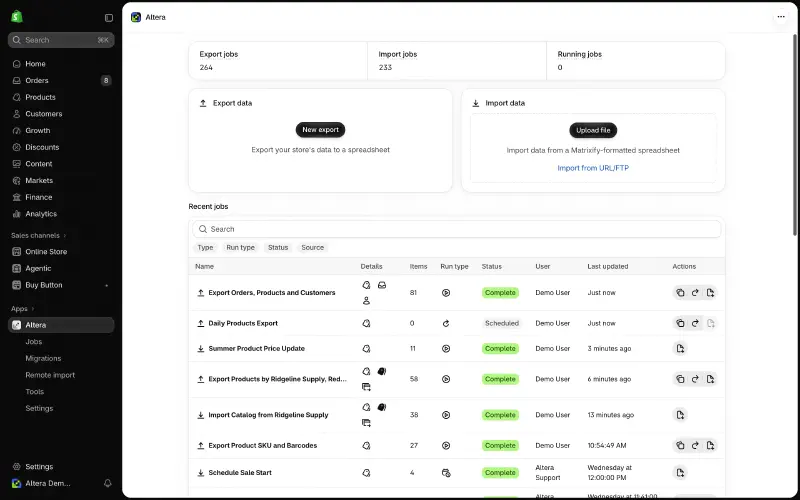
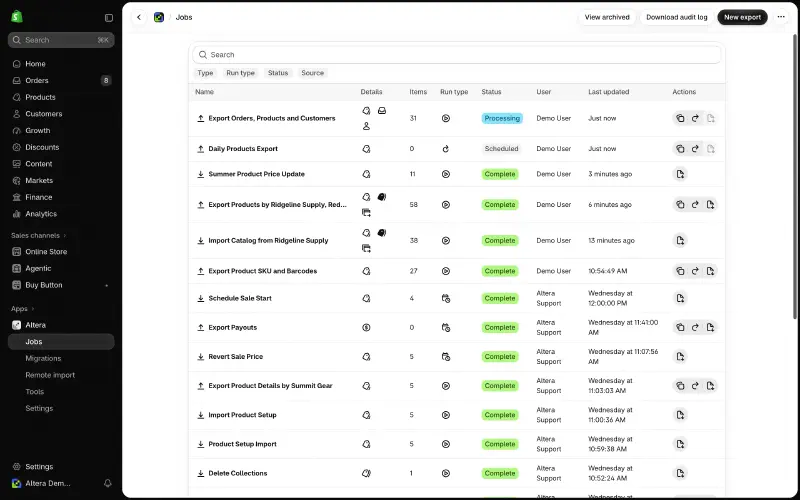
The Jobs page lists every import and export on the store: running, scheduled, and finished. Open any job to download its source and output files, rename it, archive it, or cancel it while it is running or waiting to run. Exports and remote-source imports have Run Again. Scheduled jobs show their frequency, status, and next run time, and can be edited in place. Each job records who started it. The job detail page article describes every element.
For compliance reviews or a handoff, you can download an audit log of every job as a CSV.
Run Altera without the UI#
You can also run imports and exports from the command line or an AI assistant.
The command line#
The altera CLI runs imports, exports, and scheduled jobs from a terminal, and uploads and downloads Shopify files. You create an API key with only the permissions a script needs. Field discovery is built in: altera ref prints the field reference for any data type, and the --llm flag emits it in a form that Claude Code and other assistants read directly. The CLI is included on the Developer and Pro plans. Start with the CLI overview and using the Altera CLI with Claude Code.
AI assistants#
Altera runs an MCP server. Install the Altera connector in Claude or ChatGPT and run imports and exports from a conversation. Shopify Sidekick can check on jobs, set up exports, and download them. Your store data stays inside your own assistant session and is not used to train any model. Jobs started this way appear on the Jobs page like any other, with who started them.
Commonly used settings#
- Remote connections. Save a Google, Dropbox, FTP, SFTP, or WebDAV connection once, and pick it by name in any import or export.
- Email notifications. Choose which jobs email you and when. Any single job can override the setting. See email notifications for jobs.
- Data permissions. Control which data types can be imported or exported on this store. See data permissions.
- File retention. How long Altera keeps uploaded and exported files before deleting them. See the data retention policy.
Getting help#
- Getting started: the first export, the first import, and a WooCommerce migration, step by step.
- Reference: every field for every data type, plus data formats and error codes.
- How-to: guides for specific jobs, from refunds to translations.
- Support: support@getaltera.com. See support hours.